DoctorWhy
Full Member
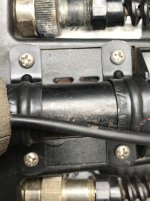
After about two-and-a-half years of heavy use, the Control Box on my Garrett AT Pro finally broke off. Both of the box's molded plastic bosses that were fastened with screws through the shaft broke off. Actually, a pretty poor engineering design...
First in-the-field fix was to wrap the box to the shaft with good old 'Gorilla Tape. It worked well but was pretty ugly. Wanting a more sturdy and 'aesthetic' fix, I did a bit of 3D drafting and came up with a design that I 3D printed.
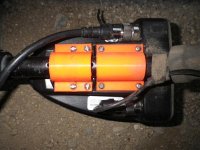
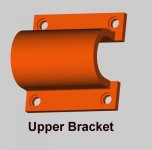
The 3D-printed upper bracket uses the four existing screws on the housing -- just removed the screws, placed the bracket over the shaft and re-fastened those screws.
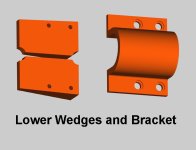
Wanting an even more secure mount, I designed two 'wedges' and another bracket. The 'wedges' were designed to fit into the cavities and around the broken-off stubs of the plastic bosses. The wedges were tapped with a 6-32 tap after 3D printing. The wedges were then secured to the bracket with 6-32 screws and the assembly glued in place with "DAP Weldwood Contact Cement"
Even though the "U" brackets are a tight fit, I also used a bit of the "DAP Weldwood" under the "U" bracket, against the shaft to prevent the box from rotating.
Since this 'fix', I now have over 8 hours of successful and happy use.
I wish there was an easy way to share the ".obj" files for anyone who would want to 3D print them. Remember, I take no responsibility for your use of this 'fix'; you are on your own...
Good Hunting!
--Bert
First in-the-field fix was to wrap the box to the shaft with good old 'Gorilla Tape. It worked well but was pretty ugly. Wanting a more sturdy and 'aesthetic' fix, I did a bit of 3D drafting and came up with a design that I 3D printed.
The 3D-printed upper bracket uses the four existing screws on the housing -- just removed the screws, placed the bracket over the shaft and re-fastened those screws.
Wanting an even more secure mount, I designed two 'wedges' and another bracket. The 'wedges' were designed to fit into the cavities and around the broken-off stubs of the plastic bosses. The wedges were tapped with a 6-32 tap after 3D printing. The wedges were then secured to the bracket with 6-32 screws and the assembly glued in place with "DAP Weldwood Contact Cement"
Even though the "U" brackets are a tight fit, I also used a bit of the "DAP Weldwood" under the "U" bracket, against the shaft to prevent the box from rotating.
Since this 'fix', I now have over 8 hours of successful and happy use.
I wish there was an easy way to share the ".obj" files for anyone who would want to 3D print them. Remember, I take no responsibility for your use of this 'fix'; you are on your own...
Good Hunting!
--Bert