Silversmith45
Elite Member
Does it have to be a brass brush? Would a toothbrush work?

Does it have to be a brass brush? Would a toothbrush work?
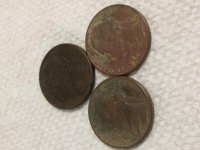
I just tried it with what I had at home. I'm only posting this so no one else does it lol I had a REALLY crusty dug barber dime that I tried it on. I didn't have a brass brush so used a Brillo pad (too aggressive!!!) also I didn't have white vinegar only cider vinegar. It did work well but the scratches on the coin are very visible. Ill be picking up a brass brush today. I have a crusty seated dime also but want to wait til I have the right tools before I try it. Thanks again OP!
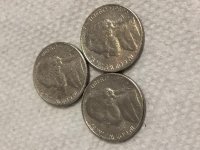
Decided to apply my cleaning method to a trio of ugly dug modern jefferson nickels. I'm not claiming any speed records here, just showing anyone who possibly wants to try this method on various coins what kind of results to expect. I like the method but can't stress the importance of the brass brushing. With these nickels I had to soak for a minute or two, then brush both sides, soak for a minute or two, brush both sides. I think all in all I brushed the coins three times. I realize this method arbitrarily may not make pitted coins look great as it loses the ability to gain detail through contrasting and silhouetting. I came up with a recipe to add a unique patina back on if you're not happy with the results.
I have a large cent that I found a couple years ago and I used electrolysis to clean it; never was happy with the results. I'd be willing to try your technique for adding a patina back onto it. Thanks.
Oddly enough it was a large cent that I cleaned and re-patina'd! I came up with a solution of mixing a few drops of yellow food coloring with some sanded rust powder. Spread it over one side of the coin first and allow it to air dry for a day or two. It will dry and almost completely cover all features so next I took steel wool and brushed away at it until I got the contrasting detail I was looking for. At this point, I knew I was going to put it into a coin flip and didn't want the solution smearing on the plastic so I sprayed a light coat of clear coat from a rattle can (which darkened the color by the way so when brushing with the steel wool, you might go a little beyond what you think looks good cuz the clear coat darkened it). Then flip the coin and repeat. In my picture examples, the front was with the yellow food coloring AND the rust powder and the back was just the food coloring so you can determine the shade you want.
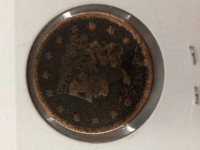
As a coin collector and former coin dealer I can honestly say that you've hurt the value of some of the coins you've cleaned because the coins now have an unnatural appearance. BUT....to each their own.Barber Quarter
As a coin collector and former coin dealer I can honestly say that you've hurt the value of some of the coins you've cleaned because the coins now have an unnatural appearance. BUT....to each their own.
all I see I a bunch of scratched up coins
all I see I a bunch of scratched up coins
In the before pics, the scratches are there, just filled with dirt. In the after pics, the scratches are reflecting light but I can assure you I didn't make the scratches.
If the mohs hardness of the brush is harder than the object you are scratching it.... even aluminum foil scratches silver... but not copper, but aluminum alloy will scratch copper. brass is harder than aluminum so...
If I ever get old dug coins to experiment with, I will show some methods that don't scratch coins nor use harsh chemicals... but i'm sold on 2 ways currently... just need to find a way to get the harder green off which i'm thinking hard plastic.
That makes sense, but the only coin pictured that I'm not a hundred percent on is the steel wheat penny. The rest, you can look at the before, locate a scratch line that's been filled with dirt, oil, etc., and scroll down to the bottom pic of it all cleaned up and see the exact same scratch but this time the walls of the valley are now reflecting light, so it appears shinier as it is reflecting white light. Agree/Disagree?
And that's why I posted this for others to see before they tried. I'm not selling these and I got tired of looking down at a ugly brown coin. I appreciate everyone's knowledge and insights but I have to disagree about their beauty, which of course cannot be contested as there is no truer example of ambiguity than the relative concept of beauty.Another lifelong coin collector here and I have to agree with a couple others who said all they see is scratched up, overcleaned coins.
I don't want to come off as a know-it-all, but your method goes straight to the harshest possible ways of cleaning coins.
Hydrochloric acid (that's what you get when you mix salt and vinegar) is eating away a significant layer of metal from the coin, and the brass brush is scratching the heck out of it, whether you can see it or not. Collectors can, even if they need a magnifier.
All of the silver coins you showed could have been run with electrolysis of some sort (even the spit and foil method), looked great and had their collecting value retained. If that doesn't work, you can go to the next level for common date coins- glass scouring powder- it is abrasive, but at a level no one can notice without a powerful microscope. It's made to polish glass. It would have worked wonders on that first IH for example, without the harsh chemical strip and scrub.
And that's why I posted this for others to see before they tried. I'm not selling these and I got tired of looking down at a ugly brown coin. I appreciate everyone's knowledge and insights but I have to disagree about their beauty, which of course cannot be contested as there is no truer example of ambiguity than the relative concept of beauty.
 .
.