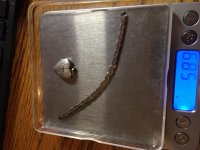
Congrats Skippy on a nice clad haul and the Sterling pieces. Can you tell us a little more about your ring making process? Trapper
Sand casting. I use Map Pro gas with a crucible to melt down up to 3 ounces of material. Depending on the detail level of the ring I want, I'll use between 90% and 95% silver (more silver is easier to carve channels).
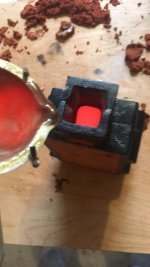
I use a basic iron frame, and casting sand (it's not delphi clay, but an oiled-sand that breathes a bit better, so no escape channels are required).
I pack the sand into the bottom of the mold, press the ring in, with a broken golf tee for a channel to the ring, and then dust it all with talcum powder.
Put the top of the mold in, and then add/compress more sand on top. Tamp it down with a hammer, and then pull them apart. I use a pair of pliers to tap the ring out (tap tap tap, then turn over and it falls out), and then finish the channel by carving out a funnel for the metal).
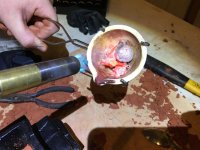
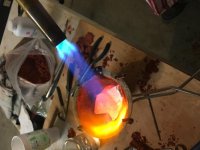
At this point I put the two molds back together, and heat up the metal in the crucible. Once melted, I continue to heat for between 2-5 minutes longer (more metal = more time required), to keep it fluid while it pours into the mold. For the last couple of minutes, I also blow heat into the sand mold channel to warm up the sand (it helps with the pour).
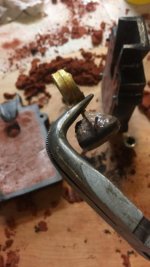
In the last 15 seconds, I take a pinch of borax and add it to the metal, and allow it melt it (it seems to pull impurities out and makes the pour better). Then while keeping the flame on, I pour into the mold.
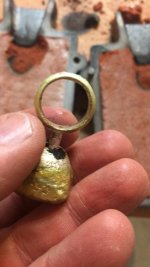
15 seconds later (and a bit of smoke from the oiled casting sand), I pull the two sides apart and inspect the product. If the pour was good, I have a nice ring, with a sprue on the top with a chunk of metal as a button.
From there, I use the pliers to grab the ring, shake off the excess sand, and drop it into either water, or pickle. (warmed up vinegar mix). Water is what I usually do, because I have to completely finish the outside with sanding, so I don't really care about firescale.
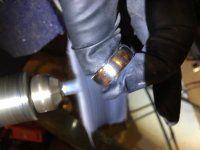
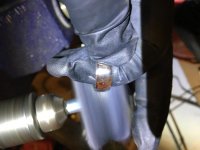
I then put the ring in a leather pouch on the view (a glove, folded over), and then use a reciprocating saw to cut off the sprue.
Then I use my welding glove to hold the ring (just to keep my fingers away from the tool), and use my dremel to grind down any remain "mess" left over from the ring mold or sprue. A rock grinder tool is all that is needed on the dremel.
I then smooth out the inside with a sander attachment on the dremel.
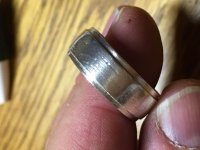
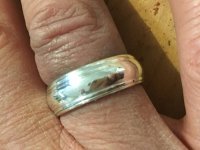
From there, I attach the ring to a rubber mount that attaches to the end of a full-sized drill. (it creates a mini-lathe like situation). I turn the drill on, holding with one hand, the drill, and using a small jeweler's file, I do the finish work on the outside of the ring. It's pretty fast. I then use 600 grit, then 800 grit and then 1200 grit on the outside.
I then wrap the rubber lathe attachment with a cone of sandpaper and then hold the ring in my glove to sand down the inside. Multiple sand paper grits, as before, but I often have to drop the ring into water, because it heats up in my hand.
I create a nice "comfort fit" style arc on the inside of the ring, and then finish the whole ring on a polishing wheel with Red Jeweler's Rouge, then white, then silver polish.
I've made bracelets, belt buckles and rings this way.
Cheers!
Skippy
Below are some random pictures, not in any particular order. Cheers!


 You almost make it sound easy...almost. Nice work!!
")