Garrett Pro Pointer Pin-Pointer Disassembly

dryflycaster

New Member
Joined
Oct 10, 2008
Messages
8
Hello Everyone,

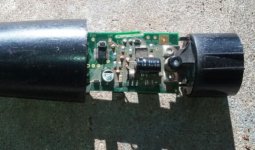
I would like to add a jack, connected to the audio output , in the housing of my Garrett Pro Pointer Pin-Pointer. Unfortunately there is no obvious way to disassemble the unit to gain access to the audio output circuitry.

I called Garrett and they said it takes a special tool to do this and it a difficult process. My thoughts are that there must be a tool very thin but fairly stiff that you would insert in the end where the battery is housed, which in turn would release a catch or pin of some sort. Allowing the internal circuitry to slide out of the housing. Something similar, but larger, to the tool used to insert or remove pins in molded connectors.

Does anyone know of a source for such a tool ? Has anyone disassembled a Garrett Pro Pointer Pin-Pointer who can supply me with the directions to disassemble it ?

I could, of course, use a Dremel saw and carefully cut a hole in the housing where the speaker opening is located. This may or may not give me access to the audio output wiring. I prefer a less destructive form of entry if possible.
 
Why in the world you would even want to do this is beyond me, evidently you want to connect it to an outside speaker or headphones which seems really odd but if you want to take the chance on voiding any warranty you have or destroying this thing that is fine with me.

Those techs aren't really telling you the truth, it is pretty easy to take this thing apart, not really easy to put it back together and actually still have a working tool however.
A circuit board and wires stuffed in there in a small space, breaking wires is a high probability stuffing it all back in.

Open cap, take out battery, take out the screw and a pair of needle nose pliers is the "special" tool you need to grab the inner housing and pull it out.
Many have done this and forgot to depress the on-off switch when pulling it out doing this and clipped that thing on the housing as circuit board is pulled past it.
Switch breaks, tiny spring goes flying...not fun.

Do what you need to do and good luck stuffing it all back in and getting it sealed up again.
 

Attachments

  • user10659_pic73871_1485444487.jpg
    user10659_pic73871_1485444487.jpg
    45.1 KB · Views: 1,372
Last edited:
DEFINITELY keep the switch ON. I personally will never take one apart again unless it's expendable already. I could do it much better the second time though.

Be real patient and slow, especially on re-assembly. It helps if have a hook, like a crochet needle or contoured paper clip, to snake the wires in via the on-off hole in the housing. The wires snag. Be careful to not scuff the insulation on those wires. It's just a thin insulation coating.
 
Evidently your vision is somewhat limited to old school detecting and dragging cables everywhere you go.

I plan to plug a RF or FM transmitter in and send the wireless signal directly to my headphones. Hence the birth of a wireless pin pointer. I converted my detectors to wireless (first with Bluetooth (delay) and now RF (no delay) ) over 3 years ago and they work flawlessly. Now it's time to bring the pin pointer up to speed. I don't care one bit about any warranty. They don't cost that much and if need be I'll pitch it in the trash and just buy another one. I don't plan to just jump in and destroy it, if it's possible to disassemble and then reassemble it though. I actually hate using a pin pointer (just one more piece of junk to carry around) but I'm trying to make it a little less painful. I worked for 40 years designing and building electronic instrumentation equipment for the Nuclear Navy and Military Satellites so working on this pin pointer doesn't seem to be all that daunting a task. Like I said if I break it, Oh Well, in the trash !

My next detector will be a totally wireless Deus with their wireless pin pointer, as soon as they release it (they seem to be dragging their feet a lot on this next release). This project is just for my CZ5 and XLT (both toss in the back seat of the truck with the dog detectors) for quick stop and run hunts while driving around once I buy the Deus. It's really more for the CZ5 than the XLT. I like the CZ5 because it hip mounts so easily. I have a Sun Ray probe on the XLT that replaces the coil when in use so the RF transmitter I have on it sends the signal to the wireless headphones. It does add a bit of extra weight to the shaft/coil assembly though and switching back an forth between the coil and the probe is cumbersome, so I may eliminate that as well and dump the probe on evilBay.

Actually they did say that putting it back together was more difficult than taking it apart.


Do you also need to push the on/off switch in during reassembly ?


-----------------------------------------------------------------------------------------------------------------------------------------------------------------------------
-----------------------------------------------------------------------------------------------------------------------------------------------------------------------------

Why in the world you would even want to do this is beyond me, evidently you want to connect it to an outside speaker or headphones which seems really odd but if you want to take the chance on voiding any warranty you have or destroying this thing that is fine with me.

Those techs aren't really telling you the truth, it is pretty easy to take this thing apart, not really easy to put it back together and actually still have a working tool however.
A circuit board and wires stuffed in there in a small space, breaking wires is a high probability stuffing it all back in.

Open cap, take out battery, take out the screw and a pair of needle nose pliers is the "special" tool you need to grab the inner housing and pull it out.
Many have done this and forgot to depress the on-off switch when pulling it out this and clipped that thing on the housing as circuit board is pulled past it.
Switch breaks, tiny spring goes flying...not fun.

Do what you need to do and good luck stuffing it all back in and getting it sealed up again.
 
If you accidently break a few and want to pitch them in the trash, can I call dibs on one? When mine goes out of warranty, it would be nice to put a new casing on it if ever needed.
 
My vision is limited?
Dragging cables....don't know about yours but mine is a pretty self-contained unit and seems to work pretty well as designed.
Got used to it that way, anyway.
If you like to tinker more power to you because I get that, but to me trying to improve this tool this way is like trying to wipe out ants with a shotgun...a bit of overkill, something I personally don't want or need but if it makes hunting more enjoyable for you, great.
Really.
What do I know, anyway...I am stuck in the stone age and I still use headphones with wires and my detector is powered by coal and steam.
None of those new fangled batteries for me because I think those things just might be part of a communist plot to take over the world. :lol:

And yes...depress the switch going back in because if you catch it on something going back same results...broken switch.
 
I taped the switch all the way down when sliding it back together, narrow strip so it can be easily snipped. May as well coat those coil wires while you have it busted open.
 
If you accidently break a few and want to pitch them in the trash, can I call dibs on one? When mine goes out of warranty, it would be nice to put a new casing on it if ever needed.

------------------------------------------------------------------------------------------------------------------------------------

I'll keep you in mind if I wreck one beyond my use. If I do it'll be yours for postage. But at the moment I'm working on a plan to secure a mini mic over the speaker vent to see if that picks up the sound OK.

I hate these damn things but I might as well try to make it as friendly as possible. b I find the vibrate to be practically useless and with my poor hearing I can't hear the thing with my headphones on.
 
DEFINITELY keep the switch ON. I personally will never take one apart again unless it's expendable already. I could do it much better the second time though.

Be real patient and slow, especially on re-assembly. It helps if have a hook, like a crochet needle or contoured paper clip, to snake the wires in via the on-off hole in the housing. The wires snag. Be careful to not scuff the insulation on those wires. It's just a thin insulation coating.

------------------------------------------------------------------------------------------------------------------------


Thanks for the hint ! I'm still not sure I'm headed that way.
 
Overkill for sure, but. I'd think that if the speaker doesn't put out enough "umph" to be picked up properly by your mic, you might be able to utilize the "buzz" of vibrate mode. Seems like a lot more actual, physical energy there to work with. Small, amplified vibration sensor type thing (accelerometer).
 
Check YouTube but definitely need to make sure the button is pushed in. I was one of the guys that had the switch break apart. It's been a couple years since I pulled mine apart but I think you need to remove the rubber button prior to disassembly.

Worse case, for about 45.00 you can bag it and send it back to Garrett and have a like new spare which is what happened to me:grin:
 
Overkill for sure, but. I'd think that if the speaker doesn't put out enough "umph" to be picked up properly by your mic, you might be able to utilize the "buzz" of vibrate mode. Seems like a lot more actual, physical energy there to work with. Small, amplified vibration sensor type thing (accelerometer).

-----------------------------------------------------------------------------------------------------------------------


It's only overkill if your hearing is good enough to hear the damn thing with your headphones on and mine is not.

I had not thought abut utilizing the vibration instead of the audio. I have thought about a simple OpAmp or 1 Transistor Amplifier circuit for the audio output though. I'm sure I can make it small enough to fit between the battery and the case with a little grinding on the case. Just one very small hole to drill for a mic wire.

Thanks for the vibration suggestion. I haven't done much work with accelerometers so I'm not to familiar with their output levels.

It's kind of funny because I did think about vibration at the headphone end because at the moment I can't find a nondestructive way to get to the internal wiring. So I thought why not take the output of a RF receiver and feed it to a small speaker (there are hundreds of them available) and then just glue/epoxy the speaker to the outside of the headphones. I did a quick test using a cheap kids toy mic and the sounds pass through the housing and out the earpiece quite good. The whole this is just a plan in the works so who knows what the end result will be. But nothing ventured is nothing gained.
 
Back
Top Bottom