
You are using an out of date browser. It may not display this or other websites correctly.
You should upgrade or use an alternative browser.
You should upgrade or use an alternative browser.
CHEAP P/P PROBE
- Thread starter chopz54
- Start date
mastereagle22
New Member
Need Help Please!
Hello
I ordered the same device but when I put the battery in all the thing does is beep constantly I adjusted the pots like the instructions say but it will only sense a penny at 1/2inch and then not all the time. It picks a quarter up between 1/4-1/2 inch. Any ideas?
Hello
I ordered the same device but when I put the battery in all the thing does is beep constantly I adjusted the pots like the instructions say but it will only sense a penny at 1/2inch and then not all the time. It picks a quarter up between 1/4-1/2 inch. Any ideas?
chopz54
Senior Member
Hello
I ordered the same device but when I put the battery in all the thing does is beep constantly I adjusted the pots like the instructions say but it will only sense a penny at 1/2inch and then not all the time. It picks a quarter up between 1/4-1/2 inch. Any ideas?
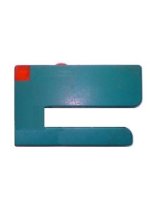
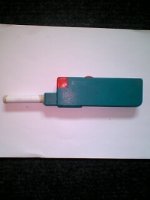
Best make your own.Takes less than an hour. This one is the MK2. ( cost about $2 to make )
ALL the shop ones are waste of money.
Attachments

Don
Forum Supporter
Can someone give me some info on one of these P/P........where to get, how to make???.........I'ld appreciate it.
chopz54
Senior Member
Con someone give me some info on one of these P/P........where to get, how to make???.........I'ld appreciate it.
Hi Don. Basically there real simple to make.
You will need
1 cable finder, Junior hacksaw, Araldite ( or hot glue gun )
Suitable tube ( sealed end. but you can always seal an open one..as I have done on the Mk 1 )
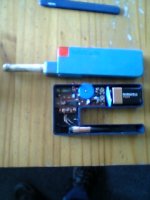
Open the cable finder up and get the ferrite rod out of the bottom section..dont cut any wires..
cut the bottom section off so your left with an oblong box.
Put ferrite rod into tube..all the way.( glue in )
make a hole the size of the tube in the corner of the unit.
Glue in place. sealing it well into the body, this will make it more stronger than just glueing to the outside of the body.. and make a plastic blank to cover the oblong hole you will have in the body.
A lot depends on which unit are going to convert. But basically they differ only on shape,and the internals are more or less the same. The Mk 1 has just a light. the MK 2 has a light and buzzer ( best i think)
Hope this helps Don. Any questions please get back to me. please get to me Chop
Don
Forum Supporter
Okay............Thanks a lot.........I'll give er a try!!
chopz54
Senior Member
freeze12
Forum Supporter
I built this pinpointer a while back & posted this info. on another forum & will post it here as i hope some of the info. will help You....
-------------------------------------------------------
Well.... i finished building the pinpointer & it works GREAT! I am going to add extras like a vibrate feature,a led light & an on & off switch probably micro push so that it turns the unit on when I want to use it ... press button= on & off when released.
Here are the part numbers from Lowes for the primary parts needed to build the Pinpointer:
Lowes part numbers & all available at Lowes.....
#1: 89173 GPD-902 Wire & Pipe detector:$12.28
#2: 23810 1/2"x10' CPVC Pipe:$2.96 (lght. tan pipe)
#3 (2) 23763 1/2" CAP CPVC:$0.56 each
For the wiring I used the solid copper wire strand from Telephone wire.Good luck as this works as good as some of the (unnamed) units I already own at a heck of lot lower cost!!
(PS) The Wire & pipe Detector has to be ordered from Lowes as it is not an in stock item.
------------------------------------------------------------
#1: I added an on-off micro slide switch as not to wear the thumb wheel switch.
#2:I trimmed the carbon wire wound rod as to concentrate the sensing area more towards the tip & then tuned the trim pots after cutting the carbon rod.
#3: I added a vibrating module from an old cell phone as to have the ability to have audible tone with the LED or just vibrate with LED when metal is detected.
Click on this link & start building!!!
http://www.treasurequestxlt.com/community/general-discussion/6890-build-your-own-pinpointer.html
chopz54
Senior Member
I built this pinpointer a while back & posted this info. on another forum & will post it here as i hope some of the info. will help You....
-------------------------------------------------------
Well.... i finished building the pinpointer & it works GREAT! I am going to add extras like a vibrate feature,a led light & an on & off switch probably micro push so that it turns the unit on when I want to use it ... press button= on & off when released.
Here are the part numbers from Lowes for the primary parts needed to build the Pinpointer:
#1: 89173 GPD-902 Wire & Pipe detector:$12.28
#2: 23810 1/2"x10' CPVC Pipe:$2.96 (lght. tan pipe)
#32) 23763 1/2" CAP CPVC:$0.56 each
For the wiring I used the solid copper wire strand from Telephone wire.Good luck as this works as good as some of the (unnamed) units I already own at a heck of lot lower cost!!
(PS) The Wire & pipe Detector has to be ordered from Lowes as it is not an in stock item.
------------------------------------------------------------
#1: I added an on-off micro slide switch as not to wear the thumb wheel switch.
#2:I trimmed the carbon wire wound rod as to concentrate the sensing area more towards the tip & then tuned the trim pots after cutting the carbon rod.
#3: I added a vibrating module from an old cell phone as to have the ability to have audible tone with the LED or just vibrate with LED when metal is detected.
Have you a photo of your conversion please? Chop
freeze12
Forum Supporter
Chop.... I just signed up with imageshack last night & did not receive a confirmation e-mail so I am waiting for them to reply.I neglected to state in my post as i was in a hurry..as i made the probe 12 inchs long,that is why i cut the ferrite rod & re-trimmed the potts.Extending the ferrite wires was a bit tricky!! The vibrate function works great as I took the vibrator out of an old cell phone ( know someone at RadioShack that gives me the trade-ins) for free, & i pull the small vibrator module out & use that with a resistor & it works just like a VibraProbe!!As soon as i get imageshck up & running I will post a pic.
I cut the ferrite rod as I found that before I did the sensing was at the tip & also extended up the side of the probe. Cutting the rod concentrated sensing to the tip.
I cut the ferrite rod as I found that before I did the sensing was at the tip & also extended up the side of the probe. Cutting the rod concentrated sensing to the tip.
Debistogs
Full Member
Hey freeze, you can go to photobucket.com & not have to wait for a confirmation & it is easy to use.
freeze12
Forum Supporter
Deb.... Hi & THANKS!!! I was trying to think of that one but for the life of Me kept drawing a blank.
ToddB64
Elite Member
Cheap P/p Probe
Hi All !
I built my own PP too, using the GB-902. Not real impressed with the way it operates though. I am satisfied with the results as far as basic construction and final appearance. However, even after many attempts at adjusting the two calibration screws, following the adjustment sequence I got from Gardner-Bender who markets the GB-902, the unit will not remain stabilized, requiring me to re-set the thumb-wheel position all the time.
BTW, I made my PP following the instructions in the Dan Clark article on the Tom's Treasures site: http://www.tomstreasures.com/probe.html.
Regarding adjusting the calibration screws, the instructions I received from Gardner-Bender Customer Service are in quotes verbatim, as follows :
"The adjustment screws will set the sensitivity. Turn them both maximum counter clockwise. Start by using 5K (editor's note: this is the value stamped on one of the screws.) and while using the tester slowly turn the screw until it starts to blink. If you reach max. adjustment begin turning the 50K screw. During that adjustment the LED should flash.
Note:
If your walls have plaster and metal lathe, the tester will always be flashing."
The following idea came to me while doing this post. I haven't given it a lot of thought and I'm not an electrical engineer, but I wonder if it would make scanning the hole easier if the end of the probe tip was bent at an angle, instead of being straight. The length of the ferrite rod could be reduced to facilitate a short tip section. A short probe tip/ferrite rod would concentrate the radio waves more or less at the tip-end of the probe (just a guess.).
Has anyone tried this idea ? I welcome your comments, pro or con. Also, if you have any suggestions on how I might be able to correct the stabilization problem mentioned above, I would appreciate your replies on this.
ToddB64
Ace250
freeze12
Forum Supporter
In My post on #2... I trimmed the ferrite rod with a dremel to make it shorter & to concentrate the detection more at the tip. I also re-adjusted the pots because of the cutting & the probe works great.Hi All !
The length of the ferrite rod could be reduced to facilitate a short tip section. A short probe tip/ferrite rod would concentrate the radio waves more or less at the tip-end of the probe (just a guess.).
Has anyone tried this idea ? I welcome your comments, pro or con. Also, if you have any suggestions on how I might be able to correct the stabilization problem mentioned above, I would appreciate your replies on this.
ToddB64
Ace250
Click on this link: http://www.treasurequestxlt.com/community/general-discussion/6890-build-your-own-pinpointer.html
chopz54
Senior Member
In My post on #2... I trimmed the ferrite rod with a dremel to make it shorter & to concentrate the detection more at the tip. I also re-adjusted the pots because of the cutting & the probe works great.
Click on this link: http://www.treasurequestxlt.com/community/general-discussion/6890-build-your-own-pinpointer.html
Theres a lot of wasted space in that one in the link. And a bit bulky to.
Dont know why he did not just turn the rod round, and make it more
compact.
Mine fits in my pocket no problem, doubt that one would.
Have to admit it looks a bit to big to go in some holes, and looks a bit "
tacky ". Chop
Attachments
freeze12
Forum Supporter
Chop... It is not bulky & the long probe enables You to get into the deeper hole easier as My Minelab detects very deep. I think it almost is on the same design as the Tinytec probes. I made a leather holster for my probe as well as My Fiskars digger & put it on My toolbelt when I am out detecting in the field.Theres a lot of wasted space in that one in the link. And a bit bulky to.
Dont know why he did not just turn the rod round, and make it more
compact.
Mine fits in my pocket no problem, doubt that one would.
Have to admit it looks a bit to big to go in some holes, and looks a bit "
tacky ". Chop
All in all....it gives someone who does not want to spent a lot of $$$ on a brand name probe the option to make their own probe very cheaply and someone with a little electrical knowledge etc. can make theirs vibrate etc. just like the high-end probe & basically do the same at a low cost.
If someone wants more detailed info. they can PM Me & either call me on the phone or vice versa or E-mail me.
chopz54
Senior Member
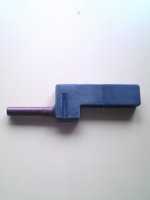
Perhaps bulky was the wrong word. Its not very compact though is it? ( with all that wasted space below the hand grip ) Perhaps you dig wider holes than me? My whole unit will fit in mine. Why the Dan just didnt cut the bottom off and drill and fit the rod on the end baffles me. It all looks a bit of a " Heath Robinson " affair.
My probe helped me locate my first silver hammered ( halfpenny...12/13 century) thats a real small coin.
"Dans" type I have seen a few years ago over here, and what I have tried to do with mine is to make it more...Robust ( mine has been dropped at height on concrete... a good test...not on purpose though...) Quick build time ( about 30 mins ) Smaller. Pleasing to the eye.
I often get people asking me where I bought it from, and when I let them
try it they want one!! It has a really good " feel " to it unlike the shop ones (sherlock/merlin...all that china rubbish)
Mk 3 comeing soon.......
Good Luck Chop
ToddB64
Elite Member
Thanks for the tips freeze12 !
Todd
Todd
Kerry
Senior Member
I printed out Bob's directions and hubby and I went to Lowe's and Menards both - neither has the GB unit he used. Nor did we find any that looked remotely similar to ones pictured. Can we purchase ANY inexpensive pipe detector to do this? My husband doesn't know how to choose an alternative model and still go by Bob's directions to make the pinpointer.