My first Electrolysis Unit w/Pics

March22

Senior Member
Joined
Dec 24, 2013
Messages
259
Location
Wayne County Indiana
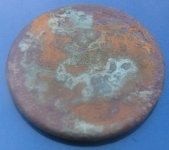
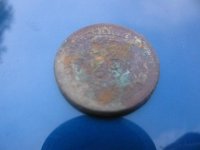
Ok, so don't clean your coins...I get it. And, I realize the coin I cleaned doesn't look perfect. However, the Large Cent (which happened to be the first one I ever found) was toasted!

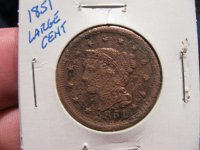
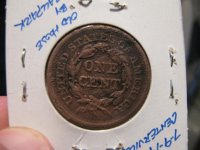
So, I made my first electrolysis unit today and worked the coin for awhile. Although it's not perfect, I think it looks a ton better than what it did. I can see some definition clearly now that I couldn't see before. What do you think?
 

Attachments

  • Large Cent Front.jpg
    Large Cent Front.jpg
    99.4 KB · Views: 347
  • IMG_6763.jpg
    IMG_6763.jpg
    50.9 KB · Views: 350
  • Large Cent Back.jpg
    Large Cent Back.jpg
    31.6 KB · Views: 354
  • IMG_6764.jpg
    IMG_6764.jpg
    46.8 KB · Views: 344
Looks nice - much better than before. If you plan on keeping it anyway, may as well clean it and make it presentable. I would have done the same.
 
How did you make your electrolysis unit?
Got a 12V adapter at Goodwill. Bought some alligator clips at Harbor Freight. Total investment around $4 bucks.

Cut the wires on the AC adapter and attached an alligator clip to the positive and one to the negative. A spoon and the coin, dipped in water with baking soda. Plug it in an there you go.

Pretty much like this: http://www.dirtyoldcoins.com/restore/electrolysis.html
 
I have the same system, only difference is I use an old blackberry charger. Works wonders on silver coins and small brass relics (headstamps, etc)
 
Back
Top Bottom