Rebuilt Excal 1000

Aquaman

Elite Member
Joined
Mar 21, 2009
Messages
3,182
Location
Hawaii (Oahu)
I've been dry docked for a good 1.5 years due to bad shoulders. Ended up needing surgery on both and then physical therapy. Long story short...I'm close to 100% and sooo ready to get wet!
So I go to check on my detectors and both my trusty Excal II 8" and a Blue Excal 1000 I bought as a project were riddled with both coil & headphone cable cracks.
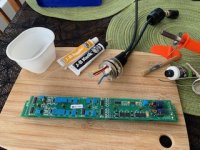
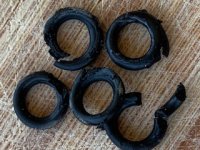
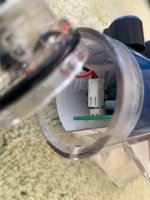
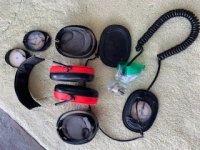
So I managed to salvage what I could from the Excal II and rebuild the Excal 1000.

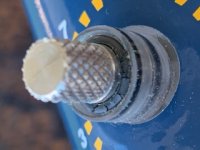
This is going to be a pic heavy thread so bare with me. First off a pic of what no water hunter wants to see and the start of the rebuild...
 

Attachments

  • IMG_0804.jpg
    IMG_0804.jpg
    31.4 KB · Views: 318
This is the Excal 1000 I bought off Ebay awhile back. She's in pretty good shape unfortunately the cables were ALL cracking. They didn't arrive that way:mad: 
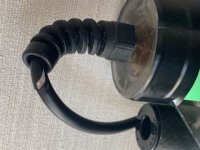
My not maintaining the cables with a little silicone spray while the detector sat...well, my bad!
 

Attachments

  • IMG_0811.jpg
    IMG_0811.jpg
    47.5 KB · Views: 326
  • IMG_0812.jpg
    IMG_0812.jpg
    43.3 KB · Views: 320
Pulled the motherboard in prep to solder the new coil I purchased from Russia.
VERY happy with the condition the new coil showed up in.
 

Attachments

  • IMG_0805.jpg
    IMG_0805.jpg
    62.9 KB · Views: 297
  • IMG_0813.jpg
    IMG_0813.jpg
    69.5 KB · Views: 303
  • IMG_0814.jpg
    IMG_0814.jpg
    47.8 KB · Views: 296
The old O-rings needed replacing.
 

Attachments

  • IMG_0817.jpg
    IMG_0817.jpg
    55.7 KB · Views: 323
  • IMG_0820.jpg
    IMG_0820.jpg
    43 KB · Views: 300
Ruslan, thank you sir. Huge difference in how smooth the controls moved after replacing the outer O-rings. A little silicone grease and they gradually set into their tracs.
 

Attachments

  • IMG_0822.jpg
    IMG_0822.jpg
    27 KB · Views: 309
  • IMG_0815.jpg
    IMG_0815.jpg
    53.8 KB · Views: 297
A quick Peltor mod on a free pair of Excal Koss headphones I got from my hero OBN through the generosity of Wainani...BTW, thank you Wainani:yes:
 

Attachments

  • IMG_0807.jpg
    IMG_0807.jpg
    28 KB · Views: 287
  • IMG_0816.jpg
    IMG_0816.jpg
    41.5 KB · Views: 283
Now for a test before reinstalling the motherboard and let me tell you, she purrs!
 

Attachments

  • IMG_0823.jpg
    IMG_0823.jpg
    43.7 KB · Views: 272
Rebuilt Blue Excal 1000:cool3:
I'm a happy camper.
Time to get wet!!
 

Attachments

  • IMG_0829.jpg
    IMG_0829.jpg
    26 KB · Views: 261
  • IMG_0827.jpg
    IMG_0827.jpg
    31 KB · Views: 274
  • IMG_0828.jpg
    IMG_0828.jpg
    30.5 KB · Views: 259
Sorry some of the pics are sideways? If someone could edit them I'd appreciate it. Oh and thank you OBN for your help and your DIY videos.
 
:dingding: Nice job and hope to see your yellow posts soon!
 
Congrats on regaining your health and on the awesome restoration project Aquaman! :yes: All that lost Hawaiian treasure is probably feeling a bit nervous now. :D
 
Thanks guys, I do appreciate the encouragement. Will be adding a TDI to keep the rebuilt Excal company. Gotta have a PI in the tool box.
 
One bad thing about the Xcal....... i had a coil go bad from setting....then noticed 3 other.... two NEW ones went bad. They had never been opened. I put some fluid film on my last one for storage OUT of the sunlight and heat..... its a thicker lanolin based product. Id check those OUTTER O rings after a few uses.... sometime they pop out a bit. GREAT JOB........ looks nice.
 
Nice job on the full tear down!
I´ve got my old excal on ebay right now for sale as parts-repair, a few more days to go...
 
Nice job. Is the over/under any heavier on your shoulder compared to the behind the elbow long shaft? I've always used the long shaft but I do like the look of those over/unders. Just dont want to waste another 100$ to find out I don't like the weight difference, how do you like it?
 
Back
Top Bottom