EDIT...just clean the red line area use the correct solder and soldering iron Parts should be aligned better, before soldering and re-assembly. EDIT
BEFORE TAKING THE ADAPTER APART: make an alignment mark from the long locating screw up the side of the adapter. Take a photo and then after separating the adapter, take another photo of the wires, brass posts and chrome connectors. Use these for correct reassembling of the adapter. If the long screw or the internal connections are in the wrong location, you may destroy the battery pod by applying the revers polarity while charging.
Proper soldering is a must. the parts must be clean, alcohol (not the drinking kind) and an acid brush will do a nice job. Use pre-fluxed ELECTRONIC solder, NO plumber's solder. Do NOT use acid paste flux. Apply a bit of solder to the tip of the soldering iron, apply heat to the connector/wire then apply a bit more solder to the junction until a nice flow shows. Let it cool on its own, do no blow on it. Re-clean with alcohol and the brush. Soldering is an art and the finished article should look smooth with no cracks, peaks or voids.
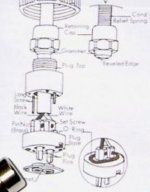
Looking at the exploded view of the adapter....
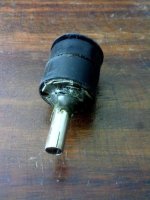
The center pin you see in your photo has a piece of solid wire soldered to it.
The outer split barrel also has a piece of solid wire soldered to it.
each of these wired should go into one of the brass posts and the set screw tightened, not soldered.
At this point the pin and barrel should look like your photo.
Next the rubber grommet should be put in place with the beveled edge going toward the adapter.
Last, the Retaining Cap needs to be screwed on leaving the assembled unit looking like your picture, the center pin centered and below the outer edge of the barrel.
If done properly, the adapter should last for years.
In my experience I have seen only one center pin broken loose from the wire by someone trying to force the wrong size connector from a wrong AC power head into the adapter.
The other option as posted is to buy a new one for about $75.