Sundragon
Senior Member
Here is how I repaired my AT Pro after the control head broke off.
I had some 1/8" ABS plastic leftover from another project. This is the same material and process I used to construct the belt clip holster for my T Handle Lesche I posted a few weeks ago.
ABS is great to work with using an oven or a heat gun, you can make it pliable once you have heated it you can make it conform to most any shape and it is extremely strong.
To start I cut out a piece little longer than the front to back dimension of the speaker cover. The length or width was about five inches, left a bunch of extra length for bending, this excess will be trimmed off after the bends are made and the bracket will be trimmed to match the x/y dimensions of the speaker cover.
To start I removed the handle with the grip and control unit from the shaft.
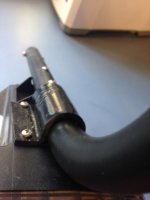
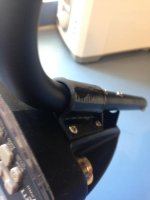
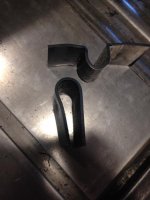
I chocked the grip S tubing in the vice and heated it up pretty hot, then laid the ABC plastic on it and heated it and bent it in half, ensuring that it was a very tight bend and conformed tightly to the tubing, then covered it with a wet rag and squeezed ti tight to conform to the outside diameter and let it cool.
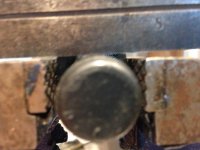
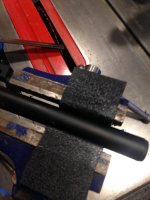
Then I put it in the vice and raised the tubing about 1/8" above the level of the jaws to compensate for the material thickness. This is the bleary weird picture, but if you look closely, you are looking at the vice jaws, the butt plug of the tubing and across the top is a steel rule. The distance from the top of the vice jaws to the bottom of the rule is the gap, this gap is necessary so that when you install the new bracket it will pull the tubing tight into against the housing, the first one I bent wouldn't pull it tight up.
Applying the heat gun at the base of the vice jaws to start the 90 degree bend. Working the heat slowly and evenly (don't let the plastic bubble or boil) you can begin the bend, as you do you then heat both sides of the plastic. Once it gets soft and lays down on the vice jaw, work the heat then press it down firmly with a metal ruler and mash it down so you have a sharp 90 degree bend, repeat for the other side.
Trim the excess material to dimensions just a bit larger than the width and length of the speaker cover.
I ran it through the table say with a miter attachment.
Now the two original broken off mounting posts and screws in the S handle tubing should still be attached. If you didn't loosen them and remove them.
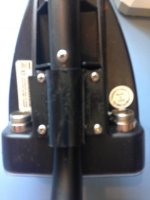
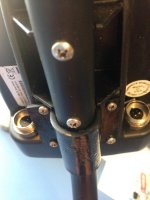
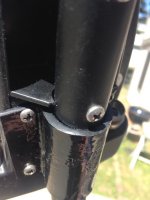
Lay the control head onto the S tubing in it's original orientation and then lay the new ABS bracket over the speaker with the screws removed and mark the four holes. I put masking tape over the bracken flange and made my x/y registration marks from index marks I made on the housing. You can just do two and then remove the speaker cover, inset two screws through the new bracked into the speaker cover, this aligns it so you can now use the speaker cover screw holes as a template to drill the remaining two holes. Then put the speaker cover back on. To remove it pry it up with a small screw driver.
Now, with the old broken mounting posts screwed into the S handle, put a small dab of JB Weld on the mating surface on the control head, where the broken off posts were, line it up and hold it in the original position and clip on the fabricated bracket, install the four screws and tighten 'er up.
Let it setup over night, if you want you can use a longer screw for the two broken off mounting posts, keeping the length short so you don't penetrate into the battery housing, compromising the water tight integrity.
I didn't bother, the new bracket was very tight and I figured the JB Weld is gonna hold the old mounting posts.
You might want to practice with the heat gun to learn how to slowly and evenly heat the material, if you don't heat it enough and then bend it, it will crack and or will severely weaken the material.
Plastic distributors are found in most metro areas and always have remnant pieces.
Online there is a guy selling a bracket for this and it costs over 30 bucks.
This cost a few nickles
My next project is going to be a sheath form my Lesch and Garret hand digger.
I had some 1/8" ABS plastic leftover from another project. This is the same material and process I used to construct the belt clip holster for my T Handle Lesche I posted a few weeks ago.
ABS is great to work with using an oven or a heat gun, you can make it pliable once you have heated it you can make it conform to most any shape and it is extremely strong.
To start I cut out a piece little longer than the front to back dimension of the speaker cover. The length or width was about five inches, left a bunch of extra length for bending, this excess will be trimmed off after the bends are made and the bracket will be trimmed to match the x/y dimensions of the speaker cover.
To start I removed the handle with the grip and control unit from the shaft.
I chocked the grip S tubing in the vice and heated it up pretty hot, then laid the ABC plastic on it and heated it and bent it in half, ensuring that it was a very tight bend and conformed tightly to the tubing, then covered it with a wet rag and squeezed ti tight to conform to the outside diameter and let it cool.
Then I put it in the vice and raised the tubing about 1/8" above the level of the jaws to compensate for the material thickness. This is the bleary weird picture, but if you look closely, you are looking at the vice jaws, the butt plug of the tubing and across the top is a steel rule. The distance from the top of the vice jaws to the bottom of the rule is the gap, this gap is necessary so that when you install the new bracket it will pull the tubing tight into against the housing, the first one I bent wouldn't pull it tight up.
Applying the heat gun at the base of the vice jaws to start the 90 degree bend. Working the heat slowly and evenly (don't let the plastic bubble or boil) you can begin the bend, as you do you then heat both sides of the plastic. Once it gets soft and lays down on the vice jaw, work the heat then press it down firmly with a metal ruler and mash it down so you have a sharp 90 degree bend, repeat for the other side.
Trim the excess material to dimensions just a bit larger than the width and length of the speaker cover.
I ran it through the table say with a miter attachment.
Now the two original broken off mounting posts and screws in the S handle tubing should still be attached. If you didn't loosen them and remove them.
Lay the control head onto the S tubing in it's original orientation and then lay the new ABS bracket over the speaker with the screws removed and mark the four holes. I put masking tape over the bracken flange and made my x/y registration marks from index marks I made on the housing. You can just do two and then remove the speaker cover, inset two screws through the new bracked into the speaker cover, this aligns it so you can now use the speaker cover screw holes as a template to drill the remaining two holes. Then put the speaker cover back on. To remove it pry it up with a small screw driver.
Now, with the old broken mounting posts screwed into the S handle, put a small dab of JB Weld on the mating surface on the control head, where the broken off posts were, line it up and hold it in the original position and clip on the fabricated bracket, install the four screws and tighten 'er up.
Let it setup over night, if you want you can use a longer screw for the two broken off mounting posts, keeping the length short so you don't penetrate into the battery housing, compromising the water tight integrity.
I didn't bother, the new bracket was very tight and I figured the JB Weld is gonna hold the old mounting posts.
You might want to practice with the heat gun to learn how to slowly and evenly heat the material, if you don't heat it enough and then bend it, it will crack and or will severely weaken the material.
Plastic distributors are found in most metro areas and always have remnant pieces.
Online there is a guy selling a bracket for this and it costs over 30 bucks.
This cost a few nickles
My next project is going to be a sheath form my Lesch and Garret hand digger.