Would you please send the mod details?
I thought I saw where someone added another knob, maybe sensitivity, and it was not the three knobs that tabdog added
")
pm me your email address and I will get them to you.
Might as well post the mod. in case anyone wants it, if you are not comfortable doing electronic work I do not recommend trying to do the mod. & it will void your warranty.
Changing coils on the Compadre
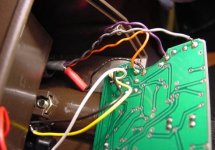
Go inside the Compadre and remove the strain relief that is located at the control housing. There are wrench flats (nuts) on both the inside and outside. Once that is loose, snip the coil wires between the coil cable and the PC Board, leaving enough on the board to identify what goes where. Cut the orange, grey, purple, and black wires that attach to the PC Board. Note that the black wire is actually soldered to the ground/shield wires in the coil cable.
Then, remove the 5-pin plug from the coil you want to use. and strip the outer covering back about 2 1/2 inches. Separate the orange, grey, purple, and blue wires from inside the ground/shield wire mesh, being careful to keep the mesh intact. Just twist the two sections together into a single strand.
Once you've done that, remove the coil wire from the Compadre housing and the hardware from the replacement coil. Thread the replacement coil cable back through the strain relief sections like you removed the original, and then solder each wire back to the PCB or to the sections of color-coded wire that you left on the PCB when cutting off the original coil cable..... orange to orange, grey to grey, purple to purple, and the ground/shield mesh to the black ground. It's actually just as easy (or easier) to remove and replace one wire at a time from the PCB while soldering each cable wire back directly to the PC Board points. Be sure to either wrap or use a piece of heat-shrink tubing on the exposed part of the mesh ground/shield part of the wire to avoid ground contact with the PCB inside the housing (red covering in photo). Also, the extra BLUE wire in the coil cable is not used, so just snip it off close to your strip edge where the other wires come out of the outer cable covering.
If you would like to have interchangable coils option, connectors can be installed in order to change out different coils on the Compadre. To do that you will need the Switchcraft female side of the coil cable connector plug (the part that fits in the control housing itself) and then the male end used on the actual coil cable. Just be sure to match the color-coded wires up to the standard scheme used on all of the land coils. Although the 5-pin plug hardware is used, only 4 pins are actually used. The standard pattern is as follows:
Pin 1 = Orange
Pin 2 = *not used
Pin 3 = Purple
Pin 4 = Grey
Pin 5 = Ground/Shielding (center pin)
The pins and female recepticles are numbered on each insert for easy referrence.
Also, the hole in the Compadre case where the stock cable strain relief passes through will need to be enlarged a little to accept the female side of the plug hardware. The housing is basicly the same as all of the uMax housings and everything will fit just fine.
Unless the parts number have changed the Switchcraft numbers for needed parts are:
5-pin Male coil cable plug = SL415M
5-pin Female control housing plug = SL405F
Strain relief spring for cable = SL05

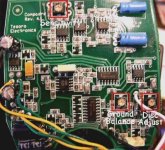
 ). Unless you really know what you are doing I wouldn't touch the g.b. or the disc. trimmers, it could screw it up big time. I am thinking that you have seen the pictures of Tabdogs Compadre, I believe he stuck some extra dials temporary on it for a joke.


