
ToddB64
Elite Member
Hi ! 
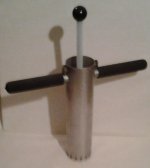
Attached are photos of the hole reamer I made years ago for building my test Garden. Sorry that some of the photos are fuzzy.
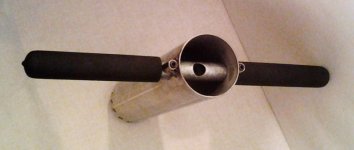
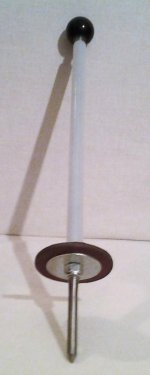
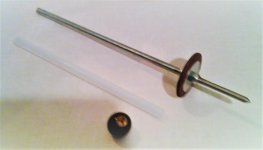
The main tube is 3" dia. x 12" Long metal with cutting teeth, a smaller dia. metal pipe handlebar for twisting, pushing and cutting the ground and plunger with a thick leather disk for pushing the dirt plug out.
The black ball knob has a brass internally-threaded insert, allowing the ball to be screwed onto the end of the threaded rod.
I welded two hex-shaped couplings with internal threads to the main tube at 180° for set-screws to stake the handlebar in place and prevent it from rotating and covered the threaded plunger rod with a piece of plastic tubing to keep the threads from catching on the edges of the through-hole in the handle bar.
There are many other tools and ideas for making holes for test samples in your garden. If I had it to do over, I would use a smaller dia. metal pipe for the main tube, maybe 2" dia. would suffice and be easier to ream the ground.
However, I posted this to give you ideas for the construction, if you like it.
Good luck with making your test garden ! It's well worth the effort and will serve you for years.
BTW, I also use this reamer in my back yard to simulate heavy metal pipe legs supporting Tot Lot equipment and practice Digger27's method of finding targets close to heavy metal. Just push the cutting teeth into the ground a little ways, lay a coin on the ground at different distances from the tube and swing your coil slow and low over the coin ! You will soon discover the right coil speed and hear that double beep, i.e. one beep for the reamer tube (simulating Tot-Lot equipment support leg) and another beep for the coin.
If you want more details on his method, go to Digger27's Profile and click-on the Statistics tab and then search through his Threads and Posts. Or use the Search tool and some generic terms, such as "thumbing the dial on the Compadre", or go to the Church of the Compadre thread and look through there.
ToddB64
Attached are photos of the hole reamer I made years ago for building my test Garden. Sorry that some of the photos are fuzzy.
The main tube is 3" dia. x 12" Long metal with cutting teeth, a smaller dia. metal pipe handlebar for twisting, pushing and cutting the ground and plunger with a thick leather disk for pushing the dirt plug out.
The black ball knob has a brass internally-threaded insert, allowing the ball to be screwed onto the end of the threaded rod.
I welded two hex-shaped couplings with internal threads to the main tube at 180° for set-screws to stake the handlebar in place and prevent it from rotating and covered the threaded plunger rod with a piece of plastic tubing to keep the threads from catching on the edges of the through-hole in the handle bar.
There are many other tools and ideas for making holes for test samples in your garden. If I had it to do over, I would use a smaller dia. metal pipe for the main tube, maybe 2" dia. would suffice and be easier to ream the ground.
However, I posted this to give you ideas for the construction, if you like it.
Good luck with making your test garden ! It's well worth the effort and will serve you for years.
BTW, I also use this reamer in my back yard to simulate heavy metal pipe legs supporting Tot Lot equipment and practice Digger27's method of finding targets close to heavy metal. Just push the cutting teeth into the ground a little ways, lay a coin on the ground at different distances from the tube and swing your coil slow and low over the coin ! You will soon discover the right coil speed and hear that double beep, i.e. one beep for the reamer tube (simulating Tot-Lot equipment support leg) and another beep for the coin.
If you want more details on his method, go to Digger27's Profile and click-on the Statistics tab and then search through his Threads and Posts. Or use the Search tool and some generic terms, such as "thumbing the dial on the Compadre", or go to the Church of the Compadre thread and look through there.
ToddB64
Attachments
-
 20161116_200540 TODDS HANDMADE HOLE REAMER FOR METAL DETECTING PRACTICE GARDEN (Front View).jpg24 KB · Views: 407
 -
 20161116_201640 TODDS HANDMADE HOLE REAMER FOR METAL DETECTING PRACTICE GARDEN (Top View).jpg25.7 KB · Views: 425
 -
 20161116_200839 TODDS HANDMADE HOLE REAMER FOR METAL DETECTING PRACTICE GARDEN (Inside plunger).jpg15.4 KB · Views: 409
 -
 20161116_201143 TODDS HANDMADE HOLE REAMER FOR METAL DETECTING PRACTICE GARDEN (Plunger parts).jpg24.7 KB · Views: 416
Last edited: