If you only want to extend the wand, you would only use two pairs of the wire. Alternately, you could use telephone wire (although I'd recommend in-wall wire, which should feel pretty round.) Telephone wire is typically also twisted pair, and would have only four wires in it, so it wouldn't be as stiff as my Cat5 choice.
The wand mod itself probably took me 3 hours, but most of that was working with the case trying to figure out how to secure the wire in the gaping hole left from the wand.
")
If I had it to do again, I'd just get rid of the LED, widen that hole a bit, and use that opening to run my wire.
As far as step-by-step, here's about the best I can provide, for the wand-only modification:
1) remove nut and bolt from the center of the unit that hold the wand in place.
2) lift the board and wand from the back of the case. the box-top, where the knob and LED are, lifts up out of the back.
3) remove the box-top from the wand. It's just held on by hot glue at this point.
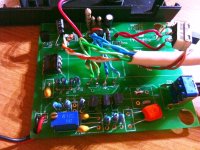
4) inspect the four thin copper wires. You'll see on the board that they are marked as pairs, with something like |____|o next to each pair. On my pinpointer, the original wire that went to the __|o side had a little knot tied in it. If yours don't, consider marking the wires with a sharpie or something.
5) splice in the longer wire. You can do this two ways:
A) The safe way, by removing one wire at a time from the board, attaching that wire to one of your Cat5 wires, then attaching the other end of that Cat5 wire to your board. This is the safest possible way to avoid mixing up the wires. It is a bit clumsy to work with, though.
B) The labeling way. Mark your wires however you see fit (I used a piece of tape folded over to hold one pair of wires together.) Unsolder all four wires. Attach the wires to the board. Attach the wires to the wand.
6) NOTE: whether you do A or B, above, make sure you consider how you're going to run the wire. For instance, if you want to run it through the LED hole, you'll need to modify the box-top a little and run the wire through it BEFORE you attach both ends of the wire to their destinations. Same goes for the wand end. If you want to put a fancy handle on it, that'd need to go on before you attach the wire to the wand.
7) with all the wires re-attached, it should work now. Test it before you continue.
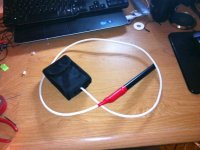
8) attach your cable to your wand, and to your pinpointer case. You don't want tugging on the wire to pull the wires free from either end. Hot glue is your friend.
I "attached" my cable to my wand a couple ways. the best method I came up with was to take a longish twisty tie (you know, the plastic-covered wire ties that hold bread bags closed and make tidy bundles of power cords on packaged electronics) and run it up though the bolt-hole on the wand, around the new cable, then back out. Twist it nice and tight, then I brought the legs
of that tie up around the cable again, near the pointiest part of the wand, and twisted them together here too. This held the wire pretty well. Then I sealed that all together by filling the end of the wand with hot glue. I also filled that little hole in the side of the wand (where the wires initially come out) with glue so that it'd be a bit more sealed against moisture. Then I wrapped it all in electrical tape, just to make it prettier.
jgray44: I hope this helps. If you've got your wires mixed up, I think the only way to un-mix them would be to use a voltmeter / multimeter to figure out which wires go together. If you have a decent one with continuity testing as an option, just use that to sort them. If you don't have a continuity tester in your multimeter, or don't have a multimeter, head over to harbor freight and pick up the cheapest one they have. It's usually 4-7 dollars. It won't have continuity testing, but you can use the resistance to tell you the same thing in this case. Hopefully your wires also came with little knots in them to identify which end goes where on the board. Send me another PM if want me to walk through how to use the multimeter in more detail.
Darter: if you rig up a way to clip it to your detector, I'd love to hear/see what you come up with. That'd be slick.